Thursday, September 27, 2012

How To Uplift Your Throw Away Items

This week I have been working on uplifting every day items that otherwise I would throw away, recycle, sell in a garage sale, etc.
 
The first was this framed art.  I loved the frame!!! 

 
By painting the glass with chalkboard paint, I transformed this into a new fun piece!  With the neutral color of the frame, it can be used in many different places within the home.
 
 
The next was an item which in normal cases would be recycled immediately. 
 
 
However, wrapping twine and gluing it around this bottle repurposed it into a great Autumn vase.   To finish off the vase, I cut small branches off our tree.  A perfect touch!

 
Don't stop here, continue your journey and visit my blog post from earlier today titled
 Give.
 
I am linking up to these beautiful blogs, please enjoy the journey!


Give


Do not withhold good from those to whom it is due, when it is in your power to do it.  Proverbs 3:27  
GIVE
 
As I sat in the chair, I realized how excited I was, and not even knowing what the final "look" would be.  At this point, the final result did not matter, it wasn't why I was here.  I had been waiting for this moment for two year and half years, well I suppose I have been waiting for this moment since the last time I did it.  My stylist brushed all of my hair into a ponytail at the nape of my neck, and with shears in hand, she started to work through the ponytail.  And finally....

 
And you ask, why would I grow all this hair just to cut it off.  The answer is simple...
 
"Locks of Love is a public non-profit organization that provides hairpieces to financially disadvantaged children in the United States and Canada under age 21 suffering from long-term medical hair loss from any diagnosis. We meet a unique need for children by using donated hair to create the highest quality hair prosthetics. Most of the children helped by Locks of Love have lost their hair due to a medical condition called alopecia areata, which has no known cause or cure. The prostheses we provide help to restore their self-esteem and their confidence, enabling them to face the world and their peers."
 
Are you someone who complains about your hair growing too fast?
 
GIVE
 
A special young lady in my life has given this same gift.  I am so proud of her!  She melts my heart daily with every breath and in every moment. 


It is her I think of when I don't want to "deal" with the length of my hair any longer.  I can't imagine if she or my son became a victim of cancer or any other life threatening disease.  The "what ifs" are more frightening the anything I have ever personally faced.  This very thought breaks my heart.  Therefore, I keep moving forward, continually trimming and conditioning, to ensure the best quality of the donation.
 
GIVE
 
There are so many rumors going around about the donation.  I for one believed these and therefore did not donate when I could have.  There are a lists of regulations here.  The most wide spread rumor I would like to put to rest is...  Your hair CAN be colored and permed, yes, yes, it can.  I started going gray at a very young age of 21, and I am now 90% gray in the front, I know, YIKES, right?!?  As you can imagine, I color lots and very regularly!  My hair is very donatable (is that a word?).  This is a cause I feel very strongly in and will continue to grow, cut, and donate.  I encourage you to do the same. 


GIVE


Thursday, September 20, 2012

Wrapped With Love

  
A few weeks ago I attended a Sprinkle in honor of my dear friend and her soon to be newborn son.  I knew exactly where I wanted to shop, this fabulous boutique with the most adorable baby items.  It didn't take long before I found this sweet addition for her Baby Boy's nursery.  EEK!!!  It was a perfect fit!
 

However, to my disappointment, the only "gift wrap" they offered was a plastic bag with a sticker label of the store and colored tissue paper... um... no....

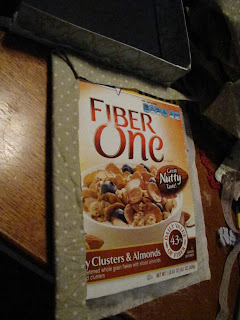
Off to work I went on a proper wrap for this sweet ornament.  Rummaging through my gift wrap organizer, a.k.a. guest room dresser, I found a box that I could spruce up for the occasion.


The box began to take shape with the newly added vintage inspired scrapbook papers.
 
 
Placing pillow filler and wrapping it with coffee stained material gave the inside a soft, vintage padding for protecting the fragile piece.
 
 
Do you have any idea how many uses cereal boxes have????
 

The ribbon really trimmed the gift box perfectly.  LOVE IT!!!


  This is the card I made for the baby gift.  It was inspired by the carousel horse in her Baby Boy's nursery, the mason jars used for flavored teas at the Sprinkle, and cupcakes for her blog The Canary's Cupcake.
 
 
I attended the Sprinkle with my best girl, my oldest.  We made it a Girl's Weekend and had a great time shopping, laughing, singing, eating, WOW!!!!

Speaking of my oldest, she recently acquired a desk.  She has been wanting one for awhile and was excited to finally have one.  It was a very sturdy desk, especially for her age, however, it wasn't quite finished...  It was painted with flat white paint and was only painted with one coat.  It hadn't been sanded and was very rough to the touch.  The desk also looked as if it had been used for target practice with a nail gun.  There were 50 + nail holes, all unfilled.  YIKES!!!
 
 
My husband and I immediately went to work on this newest project.  He sanded the entire piece.  I followed up by filling all the holes with the help of my oldest, she loved being able to get her hands dirty with Mommy.  Tee hee hee!
 
 
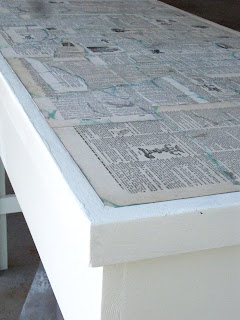
The desk was painted with the gloss white paint I have used for our wood trim in our home.  After two coats were applied, I noticed the top was warping.  UGH!  Not wanting to give up on this project, I had to find a way to work with the top.  What about decoupage, using vintage dictionary pages?!?  The pages would be a great inspiration for those study times at the desk, right?!?  To give a fun tween look to the vintage pages, I inked them in green to match her room and her bright personality! 


Accents were hand painted along the sides, accented by the colors of her room.  After I completed the accents, I added letters to the front spelling out her name.  Two coats of poly were added to protect all the accent paintings and decoupage.
 SHE LOVED IT!!!!


Since I like to keep some things private, there isn't a picture to show of the front and her name, but here is the side and a little glimpse of how it turned out.
 
 Currently I'm dying more coffee filters, my daughter thought a wreath would hang perfectly over her new desk, and I can't say no, lol!

I am linking up to these beautiful blogs, please enjoy the journey!


Thursday, September 13, 2012

Pretty In Pink


After making my Spook-tacular Halloween Wreath, I wanted to try something more colorful.  I grabbed my assortment of Martha Stewart Paints, and wouldn't you know it, I had more shades of pink then any other color.  I believe it was a sign...

First I did some investigating, the how to's to coffee filter wreaths.  I didn't really like any of the techniques used so I made my own technique. 

First I dyed LOTS of coffee filters with a mixture of paint and water, the consistancy of milk, allowing them to soak anywhere from 20 minutes to an hour.  The different times allowed deeper and lighter shades.  Next, let dry completely.


The next step is cut a spiral, oh and by the way, I used regular size coffee filters and extra large.


I started each flower by rolling from the outside in...


as I rolled, I gathered, hot glued, rolled, gathered, glued...


Some I rolled tight, some I rolled not so tight, and some I rolled very loose.  The next step was to start glueing on the wreath itself.


The pink against the chocolate brown wall ROCKS!!!  But I think I will find a space for it in my studio, against my vintage green wall.    Thanks for stopping by!

I am linking to the following beautiful blogs, enjoy your journey!


Thursday, September 6, 2012

EEK!!! Halloween is upon us!!!

My love for decorating our home for different holidays and seasons has been running rampant!  I always do the same decor for the Autumn season, however, this year I wanted to change it up a bit.  My focus was on Halloween and doing something ghoulishly fun!!!  I started with bats, 60 bats, hand cut in 5 different sizes...


 This inspiration came from my very talented friend Bryanna.  She however, hand cut 200+ bats last year for Halloween, YIKES!  The idea of the different sizes were to give the affect of the bats flying away.  Did it work?
 

The wreath was made after I attended Bryanna's Sprinkle.  She had made pink ones, absolutely gorgeous.  I wanted to make mine a little ..... dark...


Of course I had some inspiration from Pinterest as well. What did we do before Pinterest???  

What's a Halloween without spiders, spider webs, crows, skulls, blood, potions, etc, etc, etc..


The books were covered with brown grocery bags, and inked, then labels adhered to each. 


The candelabra was purchased at Goodwill, spray painted black and I added my infamous bookends to the top in place of candles.


The potion canister was a 50 cent thrift store find, I brought it home, spray painted it, and added the spooktacular label.  EEK!!!


All in all I am very pleased how it turned out!!!   I especially love how much money it (did not) cost! 

Now onto a little tour of the rest of the Autumn decor...


How are you decorating your BOOtiful homes this season???

I am linking to the following beautiful blogs, enjoy your journey!